
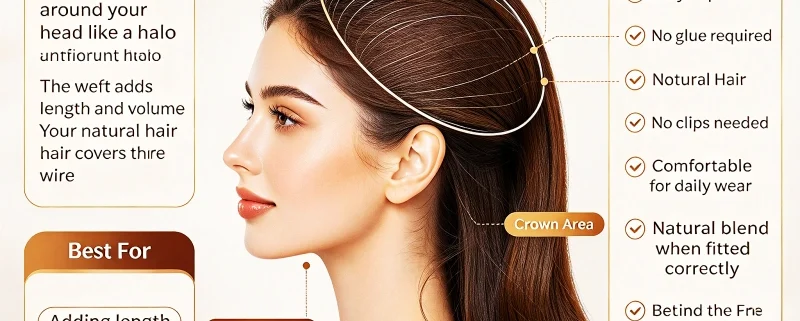
How to Apply Halo Hair Extensions: A Step-by-Step Guide
If you are searching for how to apply halo hair extensions, you probably want to know more than simply where to put the wire. The real questions are usually: How do I stop the Halo from slipping? Where should the wire sit? How tight should it be? How do I hide it? And how do I make the extension look like my own hair?
The good news is that Halo hair extensions are one of the simpler extension methods to apply at home. Unlike tape-ins, sew-ins, or K-tip extensions, a Halo normally uses one main weft attached to a thin adjustable wire. No adhesive or strand-by-strand installation is needed.
With the right size and placement, you can usually complete the application in about 3–5 minutes once you have practiced a few times. The first application may take longer because you are still learning how to adjust the wire and find the best position.
What You Need Before Applying Halo Hair Extensions
Before you start, gather everything you need so you don’t have to adjust the extension halfway through.
You will normally need:
- Halo hair extension
- Tail comb or sectioning comb
- Hair clips
- Extension-friendly brush or wide-tooth comb
- Mirror
- Optional texturizing spray
- Optional curling iron or straightener
- Optional bobby pins
For a first-time application, I strongly recommend using two mirrors if possible. A front mirror alone makes it difficult to see whether the wire is sitting correctly at the back of your head.
Should Your Hair Be Clean or Dirty?
Your hair should be dry and reasonably clean, but it doesn’t need to be freshly washed.
Extremely clean hair can sometimes be very smooth and slippery, especially if you have fine hair. In that case, a small amount of texturizing spray or dry shampoo around the crown can add grip.
Do not apply heavy oil or conditioner near the roots immediately before installing the Halo.
The goal is simple: the hair should be clean enough to blend naturally but not so slippery that the Halo moves when you turn your head.
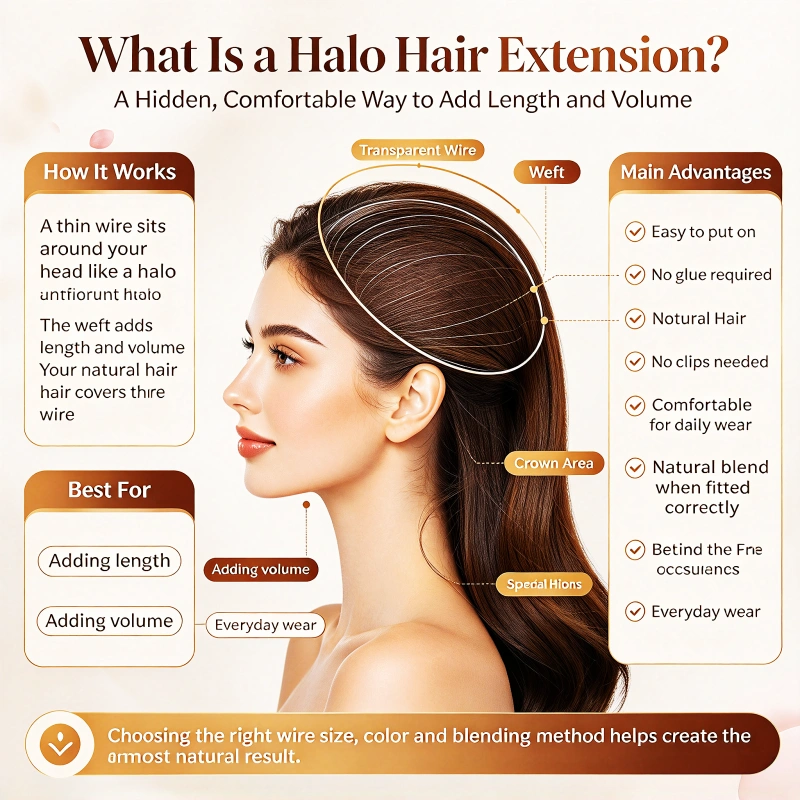
Step 1: Brush and Detangle Your Hair
Start by brushing your natural hair from the ends upward.
Do the same with the Halo extension.
This step looks simple, but it is worth taking your time. If there are knots in the extension before installation, they can become harder to remove once the Halo is positioned behind your head.
For human hair Halo extensions, a wide-tooth comb or extension-friendly brush works well.
My Tip
Do not aggressively brush directly against the weft or wire.
Hold the hair close to the top of the extension with one hand and gently brush the lengths with the other. This reduces unnecessary pulling on the construction.
Step 2: Create a Clean Section
This is one of the most important steps.
Using a tail comb, create a horizontal or slightly curved section around the crown of your head.
A practical starting point is about 1–2 inches behind the front hairline, depending on the Halo design and your natural hair density.
Clip the top section out of the way.
The lower section is where the Halo will sit, while the upper section will eventually fall over the wire and hide it.
Why Does Sectioning Matter?
If the section is too high, the Halo may become visible.
If it is too low, the natural hair above it may not provide enough coverage and the extension may not blend properly.
You are essentially creating a natural “cover layer” for the Halo.
For a beginner, it is better to spend an extra 30 seconds creating a clean section than to spend five minutes trying to hide a poorly positioned wire later.
Step 3: Adjust the Halo Wire Before Putting It On
Do not skip this step.
The wire needs to fit your head correctly.
A Halo that is too loose may move or slide backward. A Halo that is too tight may feel uncomfortable and can create unnecessary pressure.
Place the Halo around your head approximately like a headband and check the fit before final positioning.
The ideal fit should feel secure but comfortable.
You should not feel strong pressure around your head.
A Simple Fit Test
Move your head slowly from side to side.
Then look down and back up.
If the Halo immediately shifts, the wire probably needs adjustment.
If it feels tight or uncomfortable after only a few minutes, loosen it.
Adjustment systems differ by manufacturer, so follow the wire instructions supplied with your particular Halo.
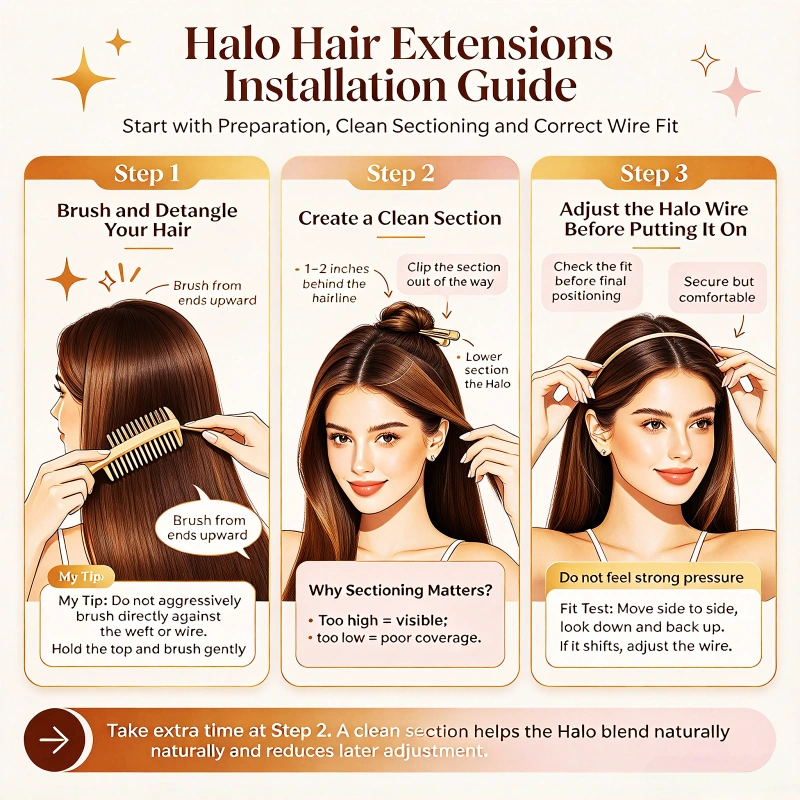
Step 4: Place the Halo on Your Head
Once you’ve adjusted the wire, place the Halo around your head.
The wire should sit around the crown area, generally above the ears and behind the front hairline.
The extension weft should fall naturally against the back of your head.
At this stage, don’t worry about making everything perfect.
First check three things:
- Is the Halo centered?
- Is the hair evenly distributed on both sides?
- Does the wire feel comfortable?
If the answer to all three is yes, continue.
If not, fix the position before releasing your natural hair.
Step 5: Make Sure the Weft Sits Flat
Look at the back of your head in a second mirror.
The Halo weft should sit reasonably flat against your head.
If you see a large gap between the extension and your head, stop and adjust it.
A common beginner mistake is assuming more tension will automatically make the Halo more secure.
It usually does not.
The objective is not maximum tightness. The objective is correct positioning and balanced support.
Step 6: Release Your Natural Hair Over the Halo
Now release the hair you clipped up.
Allow it to fall naturally over the wire and extension weft.
Do not immediately brush everything aggressively.
Use your fingers first to pull sections of natural hair over the wire.
Check the crown, sides, and area behind the ears.
Your natural hair should completely cover the transparent wire.
The Most Important Blending Rule
Do not simply place your natural hair over the Halo and stop.
You need to blend the two layers.
Take small sections of your natural hair and gently combine them with the extension hair.
This is what changes the result from “wearing an extension” to looking like naturally longer hair.
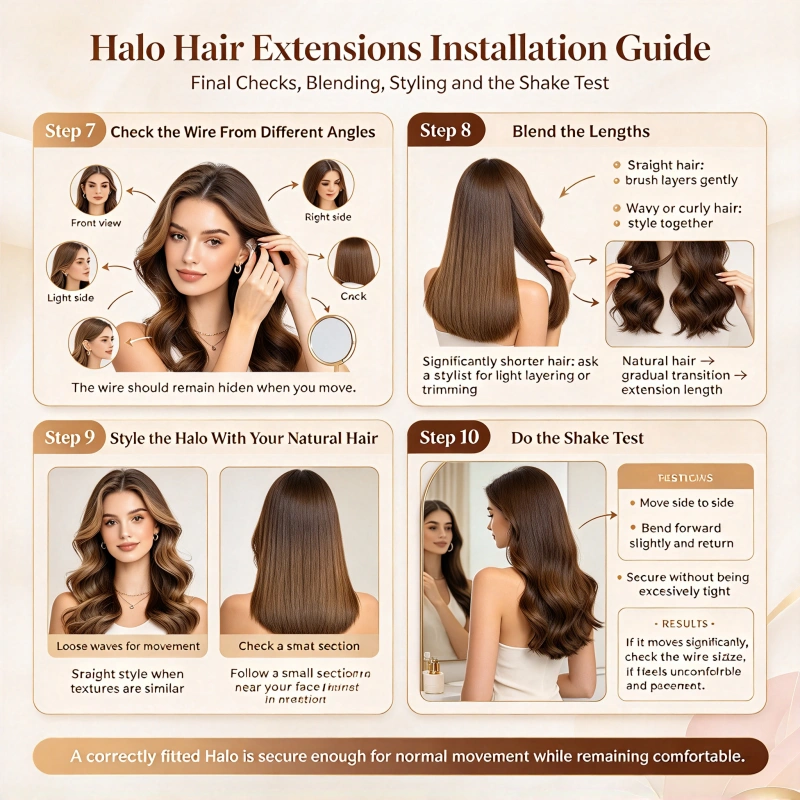
Step 7: Check the Wire From Different Angles
This is where a second mirror becomes extremely useful.
Check:
- Front view
- Left side
- Right side
- Back
- Crown
Move your head naturally while checking.
The wire should remain hidden when you move.
If it becomes visible when you bend your head forward, you may need to adjust the position slightly or release more natural hair over the wire.
Step 8: Blend the Lengths
Next, blend your natural hair with the Halo hair.
For straight hair, gently brush the layers together.
For wavy or curly hair, styling the natural hair and extension together usually produces a more seamless result.
If your natural hair is significantly shorter than the extension, a stylist may recommend light layering or trimming to create a smoother transition.
Why Blending Is So Important
Even an expensive human hair extension can look unnatural if there is an obvious difference between:
Natural hair → extension hair
The goal is to create:
Natural hair → gradual transition → extension length
This is particularly important when purchasing longer Halo extensions.
Step 9: Style the Halo With Your Natural Hair
Once the Halo is secure and blended, you can style it.
For a natural everyday look, loose waves often work well because the movement helps blend the two hair layers.
Straight hair can also look excellent when the natural hair and Halo have similar textures.
If using heat tools, follow the temperature recommendations supplied with your extension. Human hair can generally be styled, but repeated high heat can reduce the useful life of the hair.
A Practical Styling Test
After styling, separate a small section near your face.
Look at it in natural light.
If the extension color and texture look different from your own hair, you may need to adjust the blending rather than simply adding more styling product.
Step 10: Do the “Shake Test”
This is one of my favorite final checks.
Stand in front of a mirror and gently move your head from side to side.
Then bend your head forward slightly and return to a normal position.
The Halo should remain secure without feeling excessively tight.
If it moves significantly, check the wire size and placement.
If it feels uncomfortable, loosen it.
A correctly fitted Halo should be secure enough for normal movement while remaining comfortable.
How Long Does It Take to Apply Halo Hair Extensions?
For a beginner, the first application may take about 5–10 minutes because most of the time goes into finding the right wire position and learning how to blend the hair.
Once you know your wire setting and preferred placement, the process can become much faster.
A practical workflow is:
| Step | Approximate Time |
|---|---|
| Brush and prepare | 30–60 sec |
| Section hair | 30–60 sec |
| Adjust wire | 30–60 sec |
| Position Halo | 20–30 sec |
| Release natural hair | 20–30 sec |
| Blend | 1–2 min |
| Final styling | 1–3 min |
| Total | 3–8 min |
These are practical estimates, not fixed industry standards. Your hair density, length, texture, experience, and Halo construction can change the application time.
Current manufacturer and salon guides commonly describe Halo application as a process that can be completed in a few minutes once the correct fit is established.
How to Apply Halo Hair Extensions to Fine Hair
Fine hair requires extra attention to grip and blending.
The problem is usually not the application itself. The problem is that very smooth, fine hair lets the wire move more easily.
Try these techniques:
Use Light Texture
A small amount of dry shampoo or texturizing spray around the crown can increase grip.
Avoid Heavy Products
Oils and rich conditioners near the roots can make the hair more slippery.
Choose Appropriate Weight
Do not automatically choose the heaviest Halo available.
A heavier extension is not necessarily better for fine hair.
For example, a salon may offer approximately:
- 40–60g for subtle volume
- 80–120g for moderate volume
- 120–150g for fuller looks
These are practical commercial ranges, not universal requirements.
Blend Carefully
Fine natural hair can make the extension look more obvious if the upper layer is too thin.
Make sure enough natural hair remains above the Halo to conceal the wire and transition into the extension.
How to Apply Halo Hair Extensions to Short Hair
Short hair requires more attention to the transition between your natural hair and the extension.
If the length difference is large, putting a long Halo under your natural hair may create a visible line.
For short hair:
- Choose a realistic extension length.
- Position the Halo where the natural hair can cover the wire.
- Leave some face-framing hair outside the main section.
- Blend the sides carefully.
- Consider professional layering if the length difference is substantial.
The goal isn’t to hide every strand of short hair. It is to create a gradual visual transition.
How to Keep Halo Hair Extensions From Slipping
If your Halo keeps sliding, check the following in order.
1. Check the Wire
Too loose is one of the most obvious causes of movement.
2. Check the Placement
Make sure the wire sits around the intended crown area, not too far forward or back.
3. Check Your Hair Texture
Extremely smooth hair may require light texturizing.
4. Check the Weight
If the extension is very heavy for the amount of natural hair supporting it, positioning may become more difficult.
5. Use Optional Clips if Your Product Has Them
Some Halo systems include optional clips for extra security, which are especially useful for very fine or slippery hair.
Common Mistakes When Applying Halo Hair Extensions
Mistake 1: Making the Wire Too Tight
A tight wire does not automatically mean a secure Halo.
It may simply make the extension uncomfortable.
Mistake 2: Placing the Wire Too Far Back
If too much natural hair is left in front of the Halo, the extension may be difficult to blend naturally.
Mistake 3: Not Covering the Wire
The wire should disappear underneath the natural hair.
If it is visible, adjust the section rather than simply adding more hair product.
Mistake 4: Skipping Blending
The installation may be correct but still look unnatural if the natural and extension hair are not blended.
Mistake 5: Using Too Much Hair
More hair does not automatically produce a better result.
The extension weight should match the customer’s natural hair density and desired appearance.
How Should a Halo Hair Extension Feel?
A properly fitted Halo should feel secure but not painful or excessively tight.
You should be able to move your head normally.
If you experience persistent pressure, discomfort, pulling, or headaches, remove the extension and reassess the fit.
Don’t treat the wire as something you should tighten as much as possible. Current fitting guidance consistently emphasizes a comfortable, secure fit rather than excessive tension.
How to Remove Halo Hair Extensions
Removal is much simpler than installation.
First, gently lift your natural hair away from the Halo.
Hold the extension at both sides.
Lift the Halo upward and away from your head rather than pulling it through your hair.
Place it on a clean surface and gently brush out any tangles before storing it.
Never pull aggressively on the wire or hair weft.
How to Make Halo Hair Extensions Look More Natural
From practical salon experience, five factors make the biggest difference:
1. Correct color matching
The closer the shade, the easier the blend.
2. Correct wire size
A poorly fitted Halo is difficult to hide.
3. Appropriate weight
Choose volume according to the client’s natural hair density.
4. Good blending
The natural hair needs to transition smoothly into the extension.
5. Matching texture
Straight extensions on naturally curly hair require more styling to blend.
For wholesale buyers, this means product development should not focus only on hair softness. Wire construction, weft width, weight, color range, and adjustability can all influence the customer’s final experience.
Halo Hair Extension Application FAQ
Can I apply Halo hair extensions myself?
Yes. Halo extensions are designed to be relatively simple to apply at home. The most important skills are sectioning, wire adjustment, positioning, and blending.
How long does it take to apply a Halo?
Once you’re familiar with the product, a basic application takes about 3–5 minutes, while beginners may need 5–10 minutes.
Should the Halo wire be tight?
No. It should be secure but comfortable. If it creates significant pressure, loosen and readjust it.
Where should the Halo sit?
Generally, the wire sits around the crown area, above the ears and behind the front hairline. Exact placement varies according to the Halo design and head shape.
Why does my Halo keep slipping?
Common causes include an incorrectly adjusted wire, very smooth hair, incorrect placement, excessive extension weight, or insufficient blending.
Can I curl Halo hair extensions?
If the Halo is made from human hair, you can generally style it with heat when you follow the manufacturer’s recommended temperature and care instructions.
Do I need a salon to install Halo extensions?
Usually not. One of the main advantages of the Halo format is its relatively simple application. However, a professional stylist can help with color matching, cutting, layering, and blending.
Final Thoughts
Learning how to apply Halo hair extensions is mainly about getting three things right: the section, the wire fit, and the blend.
The physical installation is relatively simple. The difference between an average result and a professional-looking result usually comes from small adjustments: placing the wire at the correct height, keeping it comfortable, using enough natural hair to conceal it, matching the texture, and blending the ends properly.
For first-time users, do not try to install the Halo as quickly as possible. Spend a few minutes finding the correct wire setting and placement. Once you find the position that works for your head, you can usually repeat the same process much faster.
For salons and hair extension brands, these same principles are important when developing Halo products. A good Halo is not simply a weft of human hair attached to a wire. Hair quality, weight, weft construction, wire adjustability, color selection, and ease of application all contribute to the final customer experience.

Jgs is a professional with 12 years of experience in hair extensions, primarily helping importers better understand hair extensions, wigs, toupee, and other related products.



Leave a Reply
Want to join the discussion?Feel free to contribute!