Before and After Hair Extensions for Thin Hair on Top: Complete Guide
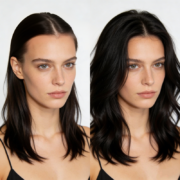
Thin hair on the top of the head is one of the most common and frustrating hair concerns. Unlike overall thinning, top-area hair loss is highly visible, difficult to style, and often resistant to volumizing products. This is where hair extensions for thin hair on top deliver dramatic “before and after” transformations—turning flat, sparse crowns into full, natural-looking styles within hours.
This guide breaks down everything: real transformation results, best extension types, technical specifications, installation methods, comparisons, and how to choose the right solution for your exact hair condition.
What Does “Before and After” Really Mean for Thin Hair on Top?
Before Hair Extensions (Typical Problems)
People with thinning hair on top often face:
- Visible scalp at the crown or part line
- Lack of volume even after styling
- Hair that separates easily under light or wind
- Difficulty holding curls or shape
- Limited hairstyle options
After Hair Extensions (Expected Results)
A proper extension solution can instantly:
- Increase density at the crown by 200%–400%
- Fully cover visible scalp areas
- Create a natural hairline and parting
- Add structure for styling (waves, ponytails, layers)
- Improve overall confidence and appearance
The key difference is not just more hair, but strategic volume placement where it matters most—the top.

Best Hair Extension Types for Thin Hair on Top (Comparison Guide)
Choosing the wrong extension type can damage already fragile hair. Below is a professional comparison:
1. Hair Toppers (Best Overall Solution)
What it is:
A partial hairpiece designed specifically to cover thinning areas on top.
Specifications:
- Base size: 2”×3” to 8”×9”
- Base materials: Lace, silk, mono, PU
- Density: 120%–180%
- Attachment: Clips, tape, or integration
Before vs After Impact:
- Before: Visible scalp and flat crown
- After: Full coverage, natural scalp illusion
Advantages:
- Designed specifically for crown thinning
- Minimal damage to natural hair
- Instant transformation
Best for: Mild to advanced thinning on top
2. Clip-In Extensions (Quick Fix Option)
What it is:
Temporary wefts clipped into natural hair.
Specifications:
- Length: 12”–24”
- Weight: 80g–200g
- Clips: Pressure-sensitive
Before vs After Impact:
- Before: Flat volume
- After: Adds overall fullness, limited top coverage
Limitations:
- Not ideal for very thin crowns
- Clips may be visible
Best for: Slight thinning + quick styling
3. Tape-In Extensions (Low-Profile Solution)
What it is:
Thin adhesive wefts applied close to the scalp.
Specifications:
- Width: 3–5 cm per tape
- Lifespan: 6–8 weeks per install
- Reusable: Yes (with new tape)
Before vs After Impact:
- Before: Thin layers
- After: Blended volume but limited scalp coverage
Advantages:
- Lightweight
- Natural movement
Limitations:
- Not designed for exposed scalp areas
Best for: Diffuse thinning, not bald spots
4. Micro Bead / I-Tip Extensions
What it is:
Strands attached with beads (no glue).
Specifications:
- Strand weight: 0.5–1g
- Application time: 2–4 hours
Before vs After Impact:
- Before: Weak density
- After: Fuller length, moderate crown improvement
Limitations:
- Requires strong natural hair
- Can stress fragile roots
Best for: Medium-density hair, not severe thinning
5. Integration Systems (Advanced Solution)
What it is:
A mesh system integrated with natural hair for full coverage.
Specifications:
- Base: Breathable mesh
- Attachment: Sewn or bonded
- Maintenance: Every 4–6 weeks
Before vs After Impact:
- Before: Severe thinning or patchiness
- After: Complete transformation
Advantages:
- Long-term solution
- Very secure
Best for: Advanced hair thinning
Real Before and After Scenarios (Detailed Breakdown)
Scenario 1: Mild Thinning at Part Line
Before:
- Slight scalp visibility
- Hair lacks lift
Solution: Small silk-base topper (3”×5”)
After:
- Invisible part line
- Natural shine and density
Scenario 2: Moderate Crown Thinning
Before:
- Noticeable thinning under lighting
- Styling doesn’t hold
Solution: Medium lace topper (5”×6”)
After:
- Full crown coverage
- Volume holds for entire day
Scenario 3: Advanced Hair Loss on Top
Before:
- Large visible scalp area
- Hair looks separated and weak
Solution: Full topper or integration system
After:
- Complete scalp coverage
- Natural density restored
How to Choose the Right Hair Extension (Step-by-Step Strategy)
Step 1: Identify Thinning Severity
- Mild: Slight scalp visibility → small topper
- Moderate: Noticeable thinning → medium topper
- Severe: Large bald spots → full topper or integration
Step 2: Choose Base Material
| Base Type | Look | Breathability | Best Use |
|---|---|---|---|
| Lace | Natural | High | Hot climates |
| Silk | Most realistic scalp | Medium | Premium look |
| Mono | Durable | High | Long-term wear |
| PU | Invisible edge | Low | Strong hold |
Step 3: Match Density
- 120% → Natural, subtle
- 150% → Balanced volume
- 180% → Full glam
For thin hair, 130%–150% is ideal to avoid an unnatural contrast.
Step 4: Select Hair Type
- Remy human hair → best quality
- Virgin hair → premium durability
- Synthetic → budget option
Step 5: Color Matching
- Match mid-lengths, not roots
- Consider highlights for blending
- Custom coloring gives best results
Installation Process (Professional Overview)
For Hair Toppers:
- Section natural hair
- Position topper over thinning area
- Secure clips or tape
- Blend with natural hair
- Style for seamless finish
Time required: 5–15 minutes
For Tape-In Extensions:
- Section hair horizontally
- Sandwich natural hair between tapes
- Press and seal
- Blend layers
Time required: 1–2 hours
Maintenance Guide (Critical for Longevity)
Daily Care
- Use sulfate-free shampoo
- Brush gently with loop brush
- Avoid pulling at roots
Weekly Care
- Deep conditioning
- Check attachment points
Lifespan
| Type | Lifespan |
|---|---|
| Clip-ins | 6–12 months |
| Tape-ins | 6–8 weeks per install |
| Toppers | 6–18 months |
| Integration | Long-term with maintenance |
Common Mistakes to Avoid
- Choosing extensions too thick → unnatural contrast
- Incorrect color matching → obvious difference
- Overloading fragile hair → breakage
- Poor installation → visible base or clips
Key Benefits of Hair Extensions for Thin Hair on Top
1. Instant Transformation
No waiting months for regrowth.
2. Non-Surgical Solution
No medical procedures required.
3. Customizable Results
Density, color, and style tailored to user.
4. Scalp Coverage
Specifically solves visible thinning areas.
5. Confidence Boost
Immediate aesthetic improvement.
Best Types of Hair Extensions for Thin Hair on Top
Not all extensions are suitable for thin hair. The wrong choice can worsen hair loss. Below is a data-driven comparison:
| Extension Type | Weight | Visibility | Suitability for Thin Top |
|---|---|---|---|
| Genius Wefts | Ultra-light | Very low | ★★★★★ |
| Hand-tied weft | Ultra-light | Very low | ★★★★★ |
| Flat weft | Light | Low | ★★★★ |
| Tape-in | Light | Medium | ★★★★ |
| I-tip | Medium | Low | ★★★ |
| Clip-in | Heavy | High | ★★ |
Pain Points Solved
| Problem | Solution |
|---|---|
| Visible scalp | Full coverage toppers |
| Flat crown | Volume-focused design |
| Styling difficulty | Added structure |
| Hair fragility | Lightweight systems |
| Uneven density | Custom blending |
FAQ (Top 10 Buyer Questions)
1. Will extensions damage thin hair?
Not if lightweight options like toppers are used correctly.
2. How natural do they look?
High-quality silk or lace bases mimic real scalp perfectly.
3. Can I wear them daily?
Yes, especially toppers and tape-ins.
4. Are they noticeable?
Proper installation makes them virtually undetectable.
5. Can I style them with heat?
Yes, if using human hair extensions.
6. How long do they last?
6 months to over a year depending on care.
7. Can I swim with them?
Yes, but secure attachment is required.
8. Do they match all hair types?
Yes, with proper customization.
9. Are they suitable for very thin hair?
Toppers are specifically designed for this.
10. How much do they cost?
Ranges from $100 to $1000+ depending on quality.
Final Verdict: Which Option Is Best?
For thin hair on top, the clear winner is:
👉 Hair toppers – best balance of coverage, safety, and natural appearance
For additional volume:
👉 Combine with tape-ins or clip-ins
Conclusion
The “before and after” difference with hair extensions for thin hair on top is not subtle—it’s transformational. The right solution restores not just volume, but also styling freedom and confidence.
If your goal is natural-looking fullness without damage, focus on lightweight, targeted solutions like toppers, rather than heavy full-head extensions.
In the world of hair restoration, this is one of the fastest and most effective upgrades you can make—no waiting, no compromises, just immediate results.
Alove Hair is a professional Chinese manufacturer of premium 100% Remy human hair extensions, wigs, and hair systems. Established in 2014, the company specializes in supplying global salons and distributors with high-quality, cuticle-intact hair products and offers comprehensive OEM/ODM private label services.